
Streamlit#
your first app#
Streamlit, like voila, panel, shiny and flask, is an alternative to using dash. At this moment, dash seems to be the most popular solution for python dashboarding. However, streamlit seems to be gaining traction. Streamlit is very easy to learn.
For installation, simply do
pip install streamlit
Now, create a python file. Now create a file, say app1.py, with the following code:
import streamlit as st

st.write("""
# Streamlit can use markdown syntax
## Level 2

+ bullet 1
+ bullet 2
"""
)
Now open up a terminal in the directory of your app and type
streamlit run app1.py
It should pop up a browser with your app running!
Input / output#
Streamlit is very easy for programming I/O. Here’s a simple example
import streamlit as st
import pandas as pd
import numpy as np

cb = st.checkbox("Did you check the box")
if cb:
    st.write("Yes you did! :-)")
else:
    st.write("No you didn't :-(")


rb = st.radio(
     "Pick an option",
     ('Option 1', 'Option 2', 'Option 3'))
st.write("you picked " + rb)


## Adding a chart

nsims = st.number_input('Put in a number of sims', value = 10)
if nsims < 10 :
    st.write("Pick a bigger number")
else :
    chart_data = pd.DataFrame(
         np.random.randn(np.round(nsims), 2),
         columns=['a', 'b'])
    st.line_chart(chart_data)
simply save this in a file, say app2.py and type streamlit run app2.py. Also, the app has a button that allows you to deploy it to the streamlit hosting service.
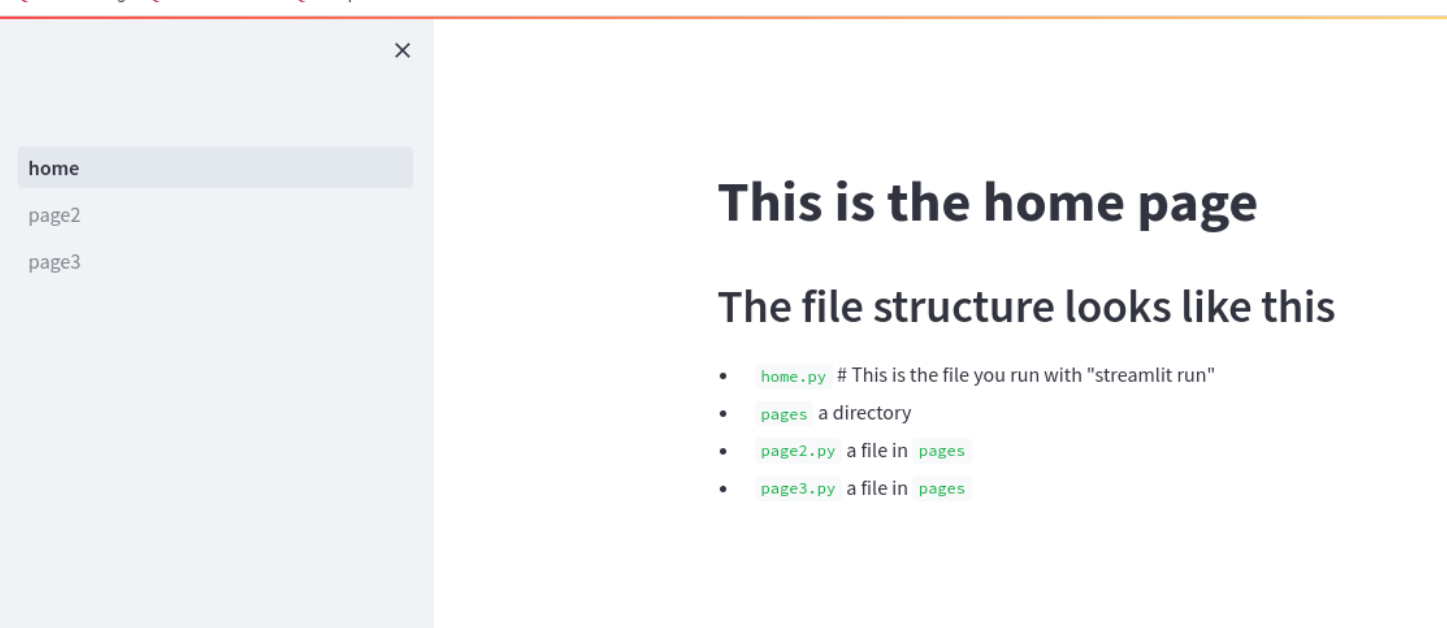
Multipage apps#
It’s easy and possible to have multi-page apps. Simply
Create a directory, say
multi-pageCreate a root file in that directory, say
home.pyCreate a subdirectory called
pagesPut the subpages as files in the
pagesdirectoryNavigate to
multi-pagethenstreamlit run home.py
An example is in book\streamlit_apps. Here is the results
Running on colab#
Using streamlit in colab takes a little doing. First, author your streamlit app and put somewhere in google drive. You can mount google drive in a colab notebook with:
from google.colab import drive
drive.mount('/content/gdrive')
You can then navigate to the file’s directory with a magic command:
%cd /content/gdrive/MyDrive/REST_OF_THE_PATH_TO_YOUR_FILE
Alternatively to this, you could just upload your streamlit file to your colab’s session storage using the folder menu on the left. You would need to redo this everytime the session gets reset.
At that point, you can install streamlit
!pip install streamlit
and we need a method to install a tunnel for our app
!npm install localtunnel &> /dev/null
The you can run your app (don’t forget the &)
!streamlit run /content/app.py &>/content/logs.txt &
Get your ip, copy this number
!wget -q -O - https://loca.lt/mytunnelpassword
Run the tunnel and click on the link. You have to paste in the ip that you obtained in the line above.
!npx localtunnel --port 8501
I would restart the runtime for each new test run of the app. Here’s an example. Click “Runtime” then “Restart session and run all”. Click on the link at the end and paste in the ip printed out from the wget command.
This only runs while that cell on colab is running. So, it’s really only useful for testing.
I would suggest creating a google drive folder with all of your files for the project and a colab notebook that runs the file in that folder.